Friday, September 29, 2006

Lesson 8 – Palo Alto Pattern

As I read some of my previous blog entries, I come upon something that is very obvious to most and something I am aware of, but have not really sat back and analyzed. This is the process of a learning curve. Most everyone understands what a learning curve is. Webster’s dictionary defines it as “a curve plotting performance against practice.” If you do an image search on Google for learning curve then you will see a lot of nice graphs with many peaks and valleys. If you take a close look at the image to the left, you will see what one university defines the learning curve to be.

Now, everyone’s individual learning curve looks much different and it also varies by the task that one is attempting to master. But, most everyone has common elements such as the fact that there will always be progress, and there will always be some form of peaks and valleys. That is, unless the skill is relatively simple the graph will not be smooth.

Why do I bring up this point about learning curves? If you will recall, I finished the previous lesson satisfied in my overall progress but I was not too happy with my approaches and landings. Today we did 11 take-offs and landings and none required a go-around and most all would be considered good landings. Every approach was close to the centerline and at the right touchdown spot. I never got anywhere close to my abort point today.

So what changed since the last lesson? Hell if I know. That is just part of the learning curve I guess. However, there were a few factors which may have contributed to my success today. The wind was only blowing 7 knots which is less than normal and since it was later in the day, there was less turbulence on the approach. Once I got the descent locked in and I was lined up with the centerline, I didn’t have to make too many adjustments from there. I spent more time making the fine power adjustments that my instructor wants me to make to stay on the appropriate glide path.

Another factor which may have helped was that after my disappointment in the landings after the last lesson, I was more focused on bettering that today. I mentally prepared myself to do well on them and was very focused on achieving that goal. I knew that I needed to do well today to keep my confidence up. Like the learning curve, your confidence tends to go up and down during the learning process as well.

So, with all the good things that happened, were there any things that needed improvement? Well, you could say that even the best pilots can always use improvements. One of the items my instructor brought up was that I was still using too much rudder when turning base and final. Since I tend to favor easier turns, this translates into less rudder required for the turn. Also, I think my flight simulator is hurting me here. I find that in real life, when you start the turn is when you put in the rudder and then it eases up as the turn continues. In my flight simulator, you actually have to hold more rudder as the turn progresses. This is a bug in the flight modeling of the simulator but one that I need to consciously get over when flying the real thing.

One of the items we talked about before the flight is how to recover from a bounce. I did have two bounces on two separate landings today and the first one I let the nose down too much and the second one I held it perfectly. The tendency when you bounce and the plane jumps into a nose high attitude is to push the stick forward but you don’t want to do that because you will then settle down pretty hard onto the runway. You want to let the stick ease forward a little bit but by a barely perceptible amount. Then you analyze how high off the runway you are in this attitude. If you are close to the ground then you just hold that position until the plane settles onto the tarmac. If you are a couple feet off the ground then you need to add a little bit of power to soften the landing. As I said, I had two occasions to try this out today and the first was not quite as smooth as the second.

Another item we talked about was wind shear. Wind shear is defined as “a sudden, drastic change in wind direction or speed over a comparatively short distance.” If you are flying along at cruise speed at high altitude, wind shear can be an annoyance but is usually not more than that. Where wind shear gets dangerous is close to the ground. In fact, wind shear has been found to be the cause of several aviation accidents, including large jets. Unfortunately, even with all of our technology today, it is very hard to predict. Pilots usually hear about it from other pilots who have flown through it and reported it. What you can do on approach to reduce the problems caused by wind shear is to increase your approach speed. The general rule is to increase the approach speed by half the estimated velocity of the wind shear. So if we are doing a normal approach at 65 MPH and there is a 20 MPH wind shear then we fly our approach at 75 MPH. This gives us a buffer in case we encounter wind shear, but allows us to still land safely if we don’t encounter any.

Last but not least, we got to practice some power off landings today. This was the second half of our engine failure exercise. Two lessons ago, we did the first half of the exercise which consists of stabilizing the glide, alerting ATC to our problem, finding a suitable landing area, and starting the approach to the landing zone. For obvious reasons, we do not actually want to land in a field somewhere so we practice the last part in the traffic pattern. To do this, we first asked permission from ATC to do a short approach. We reserved asking for this for periods when the number of approaching aircraft slowed down. Once cleared for the short approach, my instructor pulled the power to idle when we were abeam the runway numbers.

The first two power-off landings, we would have landed in the bay as I was short. It is hard to anticipate how much the plane will glide until you actually see it firsthand; thus why we practice this maneuver before we actually have an emergency. The next two times were perfect as I touched down where I was supposed to and they were both smooth landings. Again, it is a good drill but one I hope to never have to use in an emergency.

With the success of today, it moves me one step closer to the solo. My instructor gave me all the paperwork to fill out and I have to take a quiz and answer a bunch of questions about the airplane using the pilots operating handbook. I also need to schedule my FAA medical exam as soon as possible. The main thing we have left to cover before the solo flight is crosswind landings so I need to watch the weather on the day of our next lesson to see if I can find any airports in the vicinity that are reporting crosswinds. I also have the last big item left and that is the phase check. This is where you go up with another instructor for 3-4 hours. He quizzes you on the ground before the flight and then you go up and do all the basic maneuvers, ground reference maneuvers, emergency procedures, and some landings. If he is satisfied that you can fly on your own then he signs off on you and then comes the big day. As monotonous as this procedure can be, I think I like it better than the old fashioned way of doing it where you instructor just gets out of the plane one day and says, “now go up on your own and fly three take-offs and landings.” At least this way I can mentally prepare myself for the task at hand.

Monday, September 25, 2006

Lesson 7 – Pattern Practice in Livermore

The next several lessons are most likely going to be very similar. Pattern practice is essential because in order to solo, the instructor needs to feel confidant that you will be able to land the plane safely all the time. One of the key items toward this goal is teaching the student that you do not have to land at every attempt. In fact, it is good to set some parameters for yourself when making an approach. If any of those parameters are not met, it is best to go around and try the approach and landing again.

We have established two go-around parameters in the previous lessons. The first is if we bounce on the landing and the second is if we are not close to the center line. Both conditions warrant a go-around. For this lesson, we added a third item and that is setting an abort point. It is a good idea to do this, even on long runways because it gets you used to setting up good approaches and landings.

Our abort point was the second taxiway that led off of the runway. This taxiway was about a third of the way down the runway so if I had not touched down by then, the plan was to go around. On my first landing I touched down right at that spot but did not go-around and my instructor said that I should have gone around. He asked why I did not go-around when I reached my abort point and I said that I touched down right at that point so figured it was close enough. He said that is how most people think. They are fixated on getting down so much that they bend their own rules. Granted, our landing was safe and we stopped well before the end of the runway but if conditions were different or we had a shorter runway, our outcome may not have been the same. His point was well taken and I did not do that again.

Now I digress back to the beginning of the flight. Today we are flying out to Livermore airport. Livermore has two runways, one really big runway and another that is much smaller but still a little bigger than Palo Alto. The plan was to depart Palo Alto on a right Dumbarten bridge departure. We would climb and level off at 2000 feet. Once we got across the water and over Coyote Hills then we would start our climb to 3000 feet. This keeps us under the Class Bravo airspace but high enough to clear the hills on the way to Livermore.

Since we are navigating VFR and not using any VOR radials, we have to navigate by sight. We looked at a terminal chart before the flight and discussed the landmarks we would use as reference points. After we passed Coyote Hills, we should be able to see a bunch of lakes at the base of the hills. We were to fly in between these lakes until we flew over Sunol Golf Course. Golf courses are very easy to see from the air because the land is all brown out here so the green fairways of the golf course are a big contrast to the surrounding terrain. Also the golf course was right next to a major highway so if we couldn’t see, then we could follow the 680 highway until we came upon it.

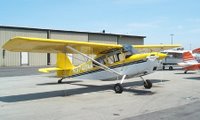
If you look at a terminal chart, you will see little maroon colored flags in various locations on the chart. These are called reporting points and since they are marked on the map, air traffic control has to know where those points are. Typically, they are located 10 to 20 miles from the airspace you are about to enter. Since we were about to enter Class Delta airspace which is controlled by Livermore Tower, I dialed in the tower frequency. “Livermore Tower, Citabria 374 Delta Mike is over Sunol, inbound for pattern work with Alpha.”

“Citabria 374 Delta Mike, enter left downwind runway 25 left, report 1 mile on 45.” What this means is that we are entering the downwind at 45 degrees to the airport runway and we are to report to the controller when we are approximately 1 mile from the airport. We are also flying a standard left pattern which means we fly a racetrack course around the airport and make only left turns. I was hoping we would get the big runway but it is better practice for me to be on the small runway.

So, around and around we went for about 7 landings. I had about 3 approaches that were too long. I think there were several factors that contributed to this. One, the pattern altitude here is a couple hundred feet higher than Palo Alto so you have further to descend and two, there was a long stretch of brown grass before the runway which made the perspective look a bit different. I always felt that I was lower than I really was.

I ended up having about two or three good landings this day. I was a little bummed at that because I really felt like I was starting to get the hang of this in my previous lessons. My instructor says I am being hard on myself. The landings were all safe which is what counts. Ironically, I was reading the recent issue of “Flying” magazine and there is an article written by Tom Benenson about what it is like to go through pilot training. One paragraph of this article struck a chord with me.

“Even as you build your capability step-by-step from one skill to the next, there will be days when nothing seems to go right. One day you’ll feel you’re the ace of the base and everything will click, you’ll feel confident and proud, but the next time you try something you’d thought you’d mastered, it just doesn’t come together the way it should. It happens. You’ve reached a learning plateau, something that afflicts almost every student. Like a batter’s slump, you’ll start hitting again; you just have to hang in there and get over it.”

On the plus side, when you fixate on a certain aspect of your flying that you are not 100 percent satisfied with, the thing you forget is there is a lot more to flying than just that one skill. In the process of getting to this area to practice these take-off’s and landings, I had to perform the pre-flight, start, taxi, run-up, takeoff, departure procedure, climb, navigation, and talking to air traffic control. These things have become second nature now and thus they don’t get mentioned much in my writings anymore like they did at the beginning. That is part of learning and I am sure by the time I get to the end of my training, I probably won’t be mentioning my approaches and landings much anymore because they will be old news.

In fact, the part I look forward to the most is my cross country training. This is the reason I wanted to fly in the first place; to get to a destination and to enjoy the scenery enroute. This lesson gave me a taste of that as it took about 15-20 minutes to get out to Livermore so I got to look around a bit. On a cross country flight though, we will be spending an hour or more between destinations and we will have several destinations in the same day so I will get to enjoy it even more. However, knowing my instructor, he will find things for me to do to stay busy during our flight.

My next lesson is on Thursday and I am not sure exactly what we will be working on but I am guessing it is more pattern work which is fine with me. I need to get this down so I can move on to my solo flight. Until next time, take care...

Friday, September 22, 2006

Lesson 6 – Emergency Procedures

Today we worked on emergency procedures. This is something that every pilot hopes they will never have to use. There are many things that could constitute an emergency but for training purposes, we focus on two; engine out and engine fires. With both events, we first stabilize the aircraft, and then go through our memorized procedures and then double check that we didn’t miss anything by using the checklist. If that does not resolve the problem then we proceed to the troubleshoot phase.

First, let’s talk about the engine out situation. Most pilots will go through their whole lives without having an engine failure. How many times has your car engine died while you were driving it? Not very often and plane engines are no exception. However, if it does occur, it can turn into a bad situation quickly if you are not prepared. My instructor has over 4000 hours of flying time and I asked him if he has ever had an engine die on him in that time and he said yes but it was easily started back up again and he continued the rest of the flight uneventfully.

Most engine failures are due to things like accidentally moving the fuel shutoff valve, or forgetting to switch the fuel selector valve when the wing tank runs dry, or descending from high altitude with a leaned engine and forgetting to enrichen the mixture. These are things that can easily be fixed if you use the proper procedures and the engine can be started again in midair.

There is a true story about a pilot that was flying the Citabria and had a passenger in the back. He asked his passenger to reach up and turn off the landing lights since the switch is behind the pilots head and closer to the rear passenger. The passenger accidentally flipped the magneto switch instead and the engine died. The pilot did not follow the checklist or else he would have caught the shut off magnetos. Instead they landed in a field and it wasn’t until he was walking away from the plane that he noticed the landing light was still on. He looked inside the cockpit and saw that his passenger had shut off the magnetos instead of the light.

If an engine failure occurs in flight, the first thing you want to do is establish your best glide speed. Every airplane has a speed where you will get the most distance with the least altitude lost. In the Citabria, that speed is 65-70 MPH depending on how heavily loaded the airplane is. Once you reach the best glide speed, you begin a turn away from obstacles. For instance, if you are heading out over the ocean then you would turn back immediately. Same thing goes for mountains or a downtown area with lots of tall buildings, etc.

Next we proceed with the memorized checklist. First, check that the fuel shutoff valve is on. Then turn the carburetor heat on as the engine could have died due to ice blocking the carburetor. Next you make sure your mixture is fully rich and that the primer knob is fully locked. Last but not least is to make sure the magnetos are turned on. If one of those items caused the engine out then at this point the engine should start up again. If not then you proceed with the next phase which is to contact ATC and declare an emergency. In our case, we were over the Stanford Linear Accelerator and tuned to the emergency frequency of 121.5 since we were not in the airspace of any ATC facilities.

The call for help goes something like this, “MAYDAY, MAYDAY, Citabria 374 Delta Mike is 5 miles south of crystal springs reservoir with engine out, planning to land in a field next to the 280 freeway.” After the emergency call we set the squawk code on our transponder to 7700. This causes our plane to flash on the radar screens of all the controllers in the area, alerting them to our emergency and our position. The goal is to do all of this in less than 300 feet of altitude lost. My best today was 500 feet but that will easily get better with practice.

By the time we get to this point, we are going to have to land it somewhere. If you have done your homework before making a flight, you can minimize the risk by picking a route that is close to a suitable landing area. The best thing to do is never fly too far from an airport. This is not hard to do in the crowded Bay Area but fly out into the suburbs and it is a lot tougher. Airports are the best places to land but not the only places. Roads can be used for landing though you want to avoid really busy highways as you may not only hurt yourself but other innocent people as well. In our case, my instructor pulled the power near SLAC and there happened to be a large horse jumping area out there which would make a good landing spot.

We spent a decent amount of time flying around and picking out suitable landing areas. Golf courses with long, straight fairways can be used, smaller and less populated roads, agricultural fields, and undeveloped land. You can land in the water but it is usually not a good idea. If you must land in the water then it is a good idea to jettison the door before landing so you can ensure that you can get out quickly as the plane sinks. The water in this area is very cold which is why it is not a good idea to land in it because you wouldn’t last very long without a wetsuit.

Once you have picked a suitable landing area you need to determine which direction you are going to land. If you can figure out the wind direction, then you want to land into the wind. You then pick out a touchdown spot and proceed abeam that point just like you were flying the downwind portion of the traffic pattern. If you need to lose altitude, then you perform circles over that spot until you are roughly 1500 feet above ground level. You then proceed with your downwind, base, and final legs, just like you would in the traffic pattern.

The next emergency we practiced is an engine fire. First thing you do if you detect a fire is to shut off its source of fuel. This is done by switching off both the shutoff valve and the mixture control. Then you turn the magnetos off to stop the electrical current from flowing to the engine. You also close the air vents because pilots can often become unconscious before they land due to smoke inhalation. Shutting the vents will help keep the smoke out of the cockpit.

If the fire has stopped at this point, you can continue with your descent and landing similar to the engine out scenario. If the fire is still raging then you need to land ASAP. To do this, you perform an emergency descent which consists of doing a steep 45 degree turn and you push forward on the control stick to dive the plane toward the ground. I was tentative in performing this maneuver and hope to never have to do it for real. Fortunately, engine fires are very, very rare.

After we finished practicing emergency procedures, we headed back to Palo Alto airport. I contacted tower and let them know we wanted to do some pattern work. As we came around for the approach I was a bit high. I lowered the power to idle but we were still a bit high so I did the maneuver that I learned in the last lesson which is the slip. We lost altitude pretty quickly and I straightened it out over the runway. The flare was a little too late as we bounced a little bit on the landing. I applied full power to do a go around and my instructor said, “Nice save with that approach.”

As we turned onto downwind, ATC said we would be following a Cessna and I looked all over for him and could not see him. Finally my instructor spotted him way down low. He was traveling pretty slow and low so it was really weird to try and follow him from way above. At one point it looked like he was actually going to land at Moffet field because he was so low. I am not sure what he was doing but he eventually turned to final and I proceeded behind him. This time, my approach was much better although I felt a little low as we neared the runway. I added some power and flared at the right time. I sat up tall in my seat so I could better judge our height above the ground and held it off pretty good. As a result, the landing was smooth. There was a brief one second shimmy on the tailwheel but I pulled the stick full aft to lock the tailwheel down and the shimmy went away. We pulled off the runway and taxied back to the parking area.

My instructor wants me to start thinking about getting my medical exam and to take a look at the exam that my club requires student pilots to complete before attempting their solo. We have a few more things to cover and some more practice with landings but I am getting close enough to the solo that I can taste it. Sunday we will be flying the farthest I have flown yet. We are going out to Livermore to practice some take offs and landings. See you then...

Monday, September 18, 2006

Lesson 5 – More Pattern Work

Due to my instructors schedule being pretty full, I have been unable to fly for two weeks. So I was pretty excited to get going today. The lesson began like most of the others where I arrived 20 minutes or so before my instructor and got the keys to the plane. I then did the pre-flight of the aircraft and got my stuff ready and my instructor came sauntering out to the plane. I was given a choice of what I felt like doing that day. More pattern work or starting to work on emergency procedures, etc. I asked my instructor if we could go somewhere other than Palo Alto. He said that we could go over to the Hayward airport and do pattern work over there which sounded good to me.

I pulled out the sectional map and he showed me the route we would be flying and gave me a general overview of the departure procedure we would be performing which was a right 45 degree departure to Hayward. This would take us over the sunken ship in the bay and then we would parallel the San Mateo bridge into Hayward.

I started the plane and we taxied out and did the engine run-up and pre-takeoff checks. I then called tower to announce that we were ready for departure and they cleared me for an immediate departure. I read back the clearance and started to move and my instructor said, “My airplane.” He then called tower back and said that I was a student pilot and we would like to hold short until the traffic had landed. I guess he didn’t want to rush me. Once the traffic landed we were cleared to depart.

The departure went as planned. We leveled off at 1,200 feet to stay below the Class B airspace. We flew out to the sunken ship and my instructor asked if we were over it. I said that I would assume so since I couldn’t see it anymore so it must be directly below the plane. He asked how we could check and I said that we could rock the wings, which I started to do but I guess I was too slow again as he grabbed the stick and yanked it to the left and then to the right.

We approached the Hayward airport and were cleared to land on runaway 28 left. Now, the first thing that strikes you as you approach the airport, especially if you are used to flying from Palo Alto airport, is how big the runway is. It is about twice as wide and three times as long as Palo Alto. This is good for learning as it gives you a wider safety margin.

We proceeded to do about 11 take offs and landings that day. I would say I had more good landings then bad landings this day, especially when I realized that if I sat up tall when it came time to flare, then I could really see the runway better and was able to ascertain my height off the ground with more accuracy. Once I discovered this, I felt much better about my next several landings.

There really isn’t much to discuss in those 11 takeoffs and landings as nothing new occurred and I really don’t remember every single one. There were two main events though that happened this day that are worth discussing. One was good and one was bad.

First, the good thing was that I got a chance to learn how to do a slip. Now, the purpose of a slip is to lose altitude without gaining airspeed. This is accomplished because you present the side of the fuselage to the relative wind. Basically, you skew the airplane sideways so that you are flying it toward the runway at an extreme angle. Sitting in the cockpit, this looks very strange. To accomplish this, we put in right rudder and then added left aileron. So the rudder moved the nose to the right and the aileron banked us to the left at the same time. Even though the plane is skewed, it continues to fly straight toward the runway. I got a chance to perform this maneuver once all the way down to the runway where I then straightened the plane out and landed on the ground.

The second event had to do with working on the landing flare. Prior to me having discovered that it would help a lot to raise myself up in the seat to see the runway better on the flare, my instructor had me focus on my pitch attitude on one of my landings. As we approached, he was coaching me to raise the nose. “Higher, higher, higher,” he would say. Eventually I had gone a little too much so he told me “too high.” Well, instinctively, I lowered the nose a bit when he said too high. He then applied full power and we started to go around. He said to never lower the nose on the landing. You are supposed to add power if your pitch attitude is too high. He said to me “If you lower the nose, this is what happens.” He then dove the airplane down from about 100 feet over the runway until we were close to the ground and then pulled up. This scared me as it was unexpected and we were close to the ground so I felt unsafe. I thought it was uncalled for also as we had not discussed any of this and it was only my fifth lesson so how was I supposed to know not to lower the nose but to add power instead?

Anyway, the rest of the day went well, including my landing at Palo Alto. Next time we plan on discussing and flying emergency procedures. After that we have to practice crosswind landings and coninue to do lots of pattern work leading up to my first solo flight. Until next time, take care...

Tuesday, September 05, 2006

Lesson 4 – The Traffic Pattern

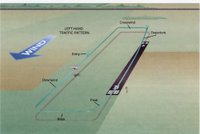
In this lesson, we get to one of the most important parts of any flight; the traffic pattern, which includes the landing and takeoff portions of the flight. The traffic pattern has 5 elements to it and they are labeled as shown in the diagram above. The first leg is the departure leg which is also known as the upwind. At a lot of airports, this consists of flying on runway heading until reaching a specified point or as directed by air traffic control. At Palo Alto airport, there are houses on a 308 degree heading from the runway so we have to observe noise abatement procedures. This consists of a turn to the right after takeoff to follow the power lines to the Dumbarton bridge. I am sure there is an exact heading mentioned in the departure procedures but my instructor hasn’t told me what it is, I just follow the power lines. We are also flying at the Vy climb speed at this stage which is 70 MPH. The Vy reference speed is the speed which gives you the best climb rate over time. This is different from the Vx climb speed which is the speed that gives you the best climb rate over distance. You use Vx climb when there is a tall object at the end of the runway that you need to clear in a short distance. For all the other times, you use Vy.

Since we are staying in the pattern, we do not continue on to the bridge but instead start the next phase of the traffic pattern which is called the downwind leg. The rule of thumb is to turn downwind upon reaching pattern altitude minus 300 feet. The pattern altitude for right traffic at Palo Alto is 800 feet so subtract 300 from that and we get 500 feet as the altitude in which we turn to the downwind leg. Now, savvy aviators will note that I skipped a leg and that is the crosswind leg. Since we are over water at this point, we don’t really want to get too far away from the airport at low altitude in case our engine dies because we may not make it back to solid ground and would have to land in the water. So, we skipped the crosswind leg and instead did a nice easy turn from the departure leg to the downwind leg.

At about the time we complete the turn to downwind, we reach the pattern altitude of 800 feet. At this point we throttle back to 2000RPM which lowers the nose and gives us about an 80 MPH speed with level pitch. At this point, it is helpful to pick out a heading reference in front of the plane to use as a heading guide so that you can correct for any crosswind that may be pushing you closer or further from the runway. At approximately half way down the runway length, we start our before landing checklist. My instructor has an acronym called CGUMPS to remember what to do for the pre-landing checklist. I am not good at remembering acronyms so I remember it by position. I start my hand at the top left console inside the cockpit and check that the landing lights are on. I also check that we have sufficient fuel to finish our pattern and make it back to the runway. I then move down to the throttle console and check that the carburetor heat is turned on. I then move over to the mixture and make sure it is set to full rich. The next item is to test the brakes to make sure they feel solid and have not leaked while we were in the air, and the last item is to make sure everyone’s seatbelts are fastened.

By the time that is complete, the tower will have usually issued us a clearance to land or a sequence number to land. In one instance they forgot about us so I requested our sequence after I had flown well downwind of the runway. Most of the time, they issued me the information I needed at the exact time I needed it which was nice given that I am still learning how to deal with everything at once. If we are cleared to land then we cut the throttle to 1500 RPM and fly downwind until the runway is roughly at a 45 degree angle behind us. With the throttle down we will start a 500 feet per minute descent at 80 MPH. Once we are roughly 45 degrees to the runway, we begin the next leg which is the base leg. Now, since we did not have much of a crosswind leg, then there is not much of a base leg either. I would complete the turn and then look to the right to spot the runway and judge when I needed to turn onto final.

Once we have turned to final, if everything went well, we are pointing directly at the runway. Now is where the challenging part begins. Once on final, we pull the nose up to slow down to 65 MPH. This is our approach speed with no flaps since the Citabria does not have flaps. Once a pitch is established that gives you the 65 MPH speed, you do not have to worry about using the pitch at all on the descent. Instead, you control your rate of descent through the use of power. If we are too high then we lower the power and if we are too low then we add a little power. This is nice because it is one less thing to worry about. So, how do you tell if you are too high or too low? Well this is where the simulator has really helped me because after doing so many landings, you develop a feel for it and it is not hard to judge whether or not you are high or low.

A more scientific approach is to pick an aim point on the front of the runway. If you focus a fixed object on that aim point, in my case it was a smudge of dirt on the windshield, then you can tell if you are high or low based upon how the spot you are focusing on moves in relation to the aim point on the runway. If you are high then the smudge will move down the runway, if you are low then the smudge will move off the front of the runway. This works for lateral movement also. I know this sounds corny but it works every time. As long as you maintain your approach airspeed, if you keep that smudge right on your aim point then you will hit that aim point. Now since at the point you do your flare and hit ground effect, you won’t actually land at that point but you will land a short distance past it.

We did about 7 or 8 takeoffs and landings and for pretty much every landing, my approach was very good. Granted, it was not easy because we had a decent crosswind and a lot of turbulence at times so the little plane was bouncing all over the place. I would get the airplane lined up and stable and just hold it where it was and then a big gust would kindly place me 20 feet off center in a matter of seconds. Despite this, I managed to cross the runway close to the centerline every time.

Since my approaches were good, I wish I could say that the following landings were all good as well. In reality, I think I only had one or two landings that I would actually call good landings. On two landing I managed to bounce, in which case we performed a go-around. The other landings were a mixed bag, from being a little hard because I flared too early, to being off the centerline because the crosswind was blowing me to the side in the flare. The two good landings we taxied off the runway and for all the others, we performed a go-around. Technically, we could have pulled off the runway on a couple of them but it is quicker to go around instead of clearing the runway, taxiing back, waiting for clearance from the tower and then taking off again. Also, my instructor wanted me to get used to performing a go-around. He made me agree to initiate a go-around on my own if we either bounced or started the flare a few feet to the side of the centerline. I was a bit tentative in doing this as I was determined to fight through my landings to the end which was why I ended up initiating only one go-around and my instructor did all the rest.

All in all, it was another good day of training. This was my first real try at doing full takeoffs and landings in the Citabria so I shouldn’t expect too much but by the time I was done, I felt pretty confidant about it. We are going to focus on this again in the next lesson and then my instructor wants to teach me slips at a higher altitude first before we do them on approach to land.

The day also started out with a pleasant surprise. As I was performing the pre-flight of the airplane, a couple with a 4 year old girl approached me and asked if the girl could look inside the airplane. I, of course, said yes and opened the door so she could take a look. She was fascinated and wanted to sit in the seat and pretend to steer the plane, so I let her. I could see the curiosity and interest on her face and was glad to provide her with a moment of excitement. Her father talked to me for a while about flying and how to get started. I could have talked about flying all day but we were interrupted by the big, noisy fuel truck which screamed up in front of the plane to fill me up with gas. The truck scared the girl away and her parents followed. But hopefully it helped to get two more people interested in aviation and I may one day see them in the air. Hope to see you there also...

Sunday, September 03, 2006

Lesson 3 – Ground Reference Maneuvers

Today’s lesson started out with a 45 minute discussion about ground reference maneuvers. The purpose of ground reference maneuvers is to start the pilot thinking about the traffic pattern. The traffic pattern is a box with the wind coming from a fixed location. To maintain a specified distance away from a fixed point, such as a runway, you must compensate for the effects of the wind.

To familiarize the student with this maneuver, it is broken down into various parts. The first part consists of doing turns around a point. You take a point on the ground, in our case it was a clump of three large power lines in the middle of a salt flat on the shore of the bay. The challenge is to maneuver in a circle around this point, keeping your radius the same the whole way around. You must also maintain your altitude within 100 ft and your airspeed within 10 knots through the whole maneuver. The key is to first determine where the wind is coming from. Once that is determined, you can then figure out where your steepest bank will be and where your shallowest bank will be.

In the ground lesson my instructor drew a circle on the white board and gave me a wind direction and velocity and asked me where the steepest bank would be and where the shallowest would be. Now, my mistake was I began to think of this as crab angles; that is, I figured when you were turning into the wind, since it would be forcing you the other direction, you would need a steeper turn to make it around. My instructor said this is a common misconception but it helps to think of the problem in terms of speed. If the wind is coming from the north at 20 knots and the plane is traveling South at 80 knots then the actual ground speed of the plane is 100 knots. If the plane is going north, then the ground speed of the plane is 60 knots. Which direction will you get off course quicker? Going South at 100 knots will get you off course more quickly then going North at 60 knots so when you are on the downwind is where you need to make the steepest bank and not when you are turning upwind. Traveling faster means you need a tighter turn in order to keep the radius the same as when you are traveling slower.

We also talked about S-Turns which is a turn around a point that is broken down into two circles. You start by taking a ground reference object, in our case a straight pier supporting the towers that extended out for a mile. A straight road is another common ground reference point for this maneuver. You cross the road with wings level and begin a turn to the right. The goal is to establish a radius that you are going to use for the rest of the maneuver. You must cross the road again with your wings perpendicular to the road and then start a turn to the left, keeping the same radius as the previous leg. This draws an ‘S’ shape on the ground and, if you performed the maneuver correctly, consists of two half circles of equal radius.

So with the ground lesson concluded, it was time to “kick the tires and light the fires,” as they say. I performed the preflight check this time by myself without my instructor watching me. It went without a hitch except we were in a newer Citabria now and there were a few differences. The one I could not figure out was how to take the fuel sample from the wings as it did not have a valve sticking down like on the older Citabria. My instructor showed me how to pull off the attachment and turn it upside down and then stick it in a bolt on the wing which then produced a flow of fuel into the container. I would have never figured that one out if he hadn’t told me.

Anyway, I got to work the radios a bit today. I wrote down the ATIS information and called up the ground controller and sounded like a professional. “Palo Alto ground, Citabria 374 Delta Mike at West Valley, taxi to runway 31 for right Dumbarton departure with Whiskey.” We got the clearance to taxi, I did the run-up, called tower and let them know we were ready for departure. This takeoff was a bit different than the last two. My instructor wanted me to control the rudders this time and he would take care of the stick and power. We started our takeoff roll and I anticipated the torque pulling us to the left so I dialed in a little right rudder. We started off great but as we gained speed that little bit of right rudder turned into too much so I let off it a bit and we started to go left a little also. By then we had already lifted off and I was spared any more zigzag lines on the runway.

We flew to the bridge and turned right this time instead of or normal left departure. We leveled off at 1,200 feet to stay below the Bravo airspace which bottoms out at 1,500 feet. We crossed the bay pretty quickly and flew over Coyote hills and Leslie flats. We had a nice view of the rock quarry below. I never realized how deep that went into the ground. We turned to the right and headed toward the salt flats. The salt flats lie in the north part of Moffet Fields airspace so I dialed in Moffet tower and said, “Moffet tower, Citabria 374 Delta Mike over Leslie Flats request permission to do ground reference maneuvers in the North West part of your airspace.” They responded with the clearance and we were told to stay below 1,500 and squawk 0342. Now, I made a little mistake on that call because we were actually going to be in the North part of their airspace. The North West would be back over by Palo Alto but the controller seemed to know what I really meant.

Once we reached the area, we flew around and surveyed it from the air. We picked out a landing spot should the engine die. We do this because the ground reference maneuvers must be performed within 600-1000 feet of the ground which doesn’t give you much time to land should the engine quit. Once that was taken care of we determined the wind direction by looking at the dust coming up from some of the plows that were working the salt flats. It was blowing in a South East direction so we flew North West which is upwind and then flew downwind of our point to start the maneuver. Once our wings were perpendicular to the big towers, I began the turn.

This maneuver went really well. We did about 4 or 5 circles around the point and then did it again in the other direction. I maintained altitude and airspeed on all but one of the revolutions. My instructor was impressed and said that was good enough to pass the check ride. The S-Turns were not quite as good but given this was the first time I have ever performed these maneuvers, they were not bad at all. The hardest challenge was making your radius exactly equal on both sides. When you do turns around a point, you are fixated on one object so it is easy to reference that object and determine if you are getting too far or too close. On the S-Turns, you have multiple objects you are fixating on so it makes it a bit more challenging.

After we did about 7 or 8 S-turns, we established crab angles into the wind to follow directly over the power lines. If you were to just fly straight over them, the wind would eventually push you downwind of them so you need to turn into the wind a bit to maintain the ground track that you desire.

We then headed back across the bay, contacted tower, entered the downwind into the traffic pattern and I made a slight mistake. The controller told us to continue downwind to the amphitheater, and then 30 seconds later he said “4 Delta Mike, cleared to land number two for landing.” Now, the other times I had flown, when the controller cleared us for landing, we started our turn to base and started our descent. So, this time I started my turn and my instructor asked what I was doing. I stopped the turn and told him what I was doing and he said we were cleared but that we were instructed to go to the amphitheater first then make our turn. I thought the clearance to land overrode the instruction to go to the amphitheater but apparently not.

After that was straightened out, we turned to base and then final over the amphitheater. The approach was bumpy in this little bird as there was a bit of wind but we came in nice enough and I did the flare and held it off as instructed. The landing was a bit more forceful than I anticipated but my instructor didn’t say anything. I assume I may have held it off a tad high again. Anyway, we taxied in and shut her down and my instructor must have congratulated me 3 or 4 times on how I did with the maneuvers today which was encouraging.

I have another lesson tomorrow and what we work on will depend on the weather. My instructor thinks the ceiling will be low which will mean we will stay in the pattern and practice take offs and landings. If the weather is good, I am not sure what we will practice but there is still a lot left on the agenda so we will see. See you in the air...

Friday, September 01, 2006

The Sim World vs. the Real World

If you browse any of the Flight Simulator forums, you will often come across postings where people compare the simulator world to the real world. A fun discussion always revolves around the complex aircraft. For instance, Precision Manuals Development Group, develops a realistic Boeing 737 and 747 aircraft with close to 99% of the systems simulated. After many sim hours in the planes, the question always comes up on the discussion forums on whether or not a person could fly the real plane, should the pilot and copilot become incapacitated. Real world 737 pilots who have played with the sim have said that there is a good chance one would be able to land the plane safely given extensive experience with the plane in the simulator. While someone could land the plane, they would most likely not do it by the book and in all situations. That is where experience of real world airline captains comes into play.

Modern airliners though, are all about systems management and monitoring. The majority of any flight is spent with the autopilot flying the plane while the pilot and copilot monitor the progress and talk to ATC. In some of the most modern planes such as the 737 NG series, and the 767, the plane is even able to land itself with the pilots’ hands free from the controls. So the ability to land a 737 with just simulator experience is not a real test of flying but of systems monitoring, management, and programming. Now, I am not saying that airline pilots don’t know how to fly, on the contrary, they fly better than I ever will but it is not a realistic scenario to compare as there is no way to test the theory in real life. Not legally anyway.

A more realistic example would be transitioning from a simulator to a GA cockpit. This is easily done and in fact, it is the route I have taken. Before I took my first flying lesson, I had over 1000 hours of flying on my home computer running Microsoft Flight Simulator. After my last flight 5 years ago, I probably put in another 500-1000 hours on my simulator before I resumed my flight training. So, I am very familiar with the simulator world but, the question is how does it compare to the real world?

The first and most obvious difference would be in spatial awareness. Humans can take in a wide angle view of their surroundings though only a limited amount is in focus at any one time. The out of focus part of your vision, also known as the peripheral vision, plays a big part in submersing you in the world. With a computer monitor you would lose this visual element. However, I am here to argue that with the proper setup, you can increase the field of view so that it is around 90% of what you would get in the real world. To do this I use three computer monitors with the wide field of view seamlessly blended between them. I also have a piece of hardware called TrackIr which allows you to move your head slightly in any direction to rotate the view on the screen. This allows you to look out the side windows on final approach or move closer to the instruments to read them better etc. When I entered the real aircraft, I was amazed at how similar it looked visually to my flight sim.

Another big killer in realism would be the flight model of the airplane you are flying. Does it fly exactly like the real thing? Well, I managed to whittle down this realism killer by downloading a highly realistic simulation of the Citabria. The company that develops it is RealAir and after a bunch of hours in it, I would have to say that it flies very similar to the real thing. All the reference speeds I have been using in the real Citabria are the same. All the power settings and resulting climb rate and airspeeds are the same. All the buttons and instruments are the same and the sound is very close to the real thing. As I get more hours in the real plane, I may find a few more differences but, I would say that this plane is 95% accurate to the real deal.

So with not much difference in the plane behavior and the visual element, is there any difference between the sim and the real world? One thing that sticks out initially is control forces. I have a CH Products yoke and rudder pedals with an attached throttle, mixture, and prop control. None of the axes have much tension in them so there is very little control force on my home setup. That is what caused some of the initial problems on my first couple of flights. When steering on the ground, I was not pushing very hard and I expected the plane to turn more sharply given the control pressure I was applying. The same thing occurred when performing coordinated turns and trying to keep the wings level in a stall. I would apply a slight pressure to the rudder pedals, like I would do in my sim, but a slight pressure in the real plane does not have the same, exaggerated effect that it does in the sim plane.

Scenery and ground reference in VFR flight is harder in the sim, though this gap is shrinking due to all the real terrain, roads, and ground texture add-ons these days in the sim world. Weather is pretty realistic with add-ons in the sim though icing and turbulence are not simulated very well. ATC can be simulated by talking to real controllers in an online Vatsim environment. However, coverage is 100 times less than in the real world and I find that controllers outside the sim environments tend to talk a lot faster than the online controllers. Vatsim tends to focus more on the heavy iron as well so it is hard to get realistic VFR coverage but terminology is the same and it is a good, safe, and cheap environment to practice your skills.

So, in my almost meaningless opinion, I feel that if you set up your sim environment like I have it set up, you can get a very realistic simulation of flying in the real world. Why then can I not fly like a pro in the real world with over 2000 hours flying in a simulator in my life? Well the difference really comes in the teaching of technique. If I was handed the keys to a plane on my first day and told to fly somewhere and land then I could have done that similar to how I do it in the sim. The problem comes with doing it safely, talking to ATC, avoiding other traffic, abiding by all airspace rules, and not exceeding the operational limits of the aircraft. In the sim, you do not have to pay attention to anything except the operational limits of the aircraft to get from point to point. In all my hours I have never really played with stalls, slow flight, ground reference maneuvers, within the tolerances of the private pilot exam because, 1.) I didn’t know what they were, and 2.) Well let’s face it; it is plain boring in a sim, no pun intended.

Anyway, however realistic/unrealistic your simulator may be, it does provide a very nice, cheap way to advance your skills. Now that I know the airspeeds, altitudes, power settings for the maneuvers, I can easily practice them in my sim so that I need to spend less time paying to practice them in the real world. See you in the air...